Users of CyberSEO Pro and RSS Retriever plugins have justifiably expressed dissatisfaction with the image quality generated by AI services like DALL-E and Stable Diffusion, pointing out that Midjourney currently leads the field in this area. This consensus makes it exciting to introduce a new feature available from CyberSEO Pro 11.000 and RSS Retriever 1.050 that now allows users to generate images for autoblogs using the Midjourney service!
It’s important to note that Midjourney does not offer a public API for integrating its AI image generator with third-party applications. Therefore, the only method available for its use is through external services. After exploring various options, we have chosen to partner with GoAPI.ai, which offers access to Midjourney through a functional API at very attractive rates.
GoAPI.ai offers two usage plans:
- Bring-Your-Own-Account (BYOA): If you already have an active Discord account with access to Midjourney, you can use it for automatic image generation via GoAPI.ai’s API for a fixed monthly subscription fee of just $10.
- Pay-Per-Use (PPU): If you don’t have a Midjourney account on Discord, you can use GoAPI.ai’s API in the same way as any other AI service, paying for each generated image at the following rates:
- Mixed Mode: $0.015 per image task
- Fast Mode: $0.045 per image task
- Turbo Mode: $0.1 per image task
It’s important to understand that the process of generating each image involves two distinct stages:
- Imagine: This step generates a preview consisting of four images.
- Upscale: The next step creates a full-size image based on one of the four previews, randomly selected. This is because the plugins operate in a non-interactive, automatic mode.
As a result, the final cost of generating each image will exceed the imagine task price listed on the GoAPI.ai website.
We have evaluated other services, such as MyMidjourney.ai, which offer significantly higher rates. Consequently, they have not been supported at this stage. However, this does not mean they will not be integrated into CyberSEO Pro and RSS Retriever in the future as alternative Midjourney API providers. This openness to incorporating other services promises more flexibility and options for users in their content generation efforts.
Image generation via the Midjourney service is seamlessly supported by plugins through both standard methods: the “Media Enrichment” settings panel and a specialized shortcode for post templates, which is formatted as follows:
[midjourney prompt="your Midjourney prompt" provider="API service provider" process_mode="image generation mode" aspect_ratio="aspect ratio" name="alt image name in the post" class="desired CSS class"]
he only mandatory parameter is prompt, with all other parameters being optional and can be omitted. Here is a detailed description of each:
prompt: A text description of the image to be generated.provider: The name of the API service provider. Currently, as Midjourney is only accessible via GoAPI.ai, this parameter can only take the value “goapi” or be omitted.process_mode: This parameter can be set to “lazy”, “fast” (the default), or “turbo”.aspect_ratio: Sets the aspect ratio for the generated image, with the default being “16:9”.name: The text to be used as the alt attribute for the generated image in your post. The default value is “%post_title%”.class: The CSS class name for the image in your post, with the default being “center”.
Examples of using the [midjourney] shortcode in a post template:
[midjourney prompt="gangster outside the corner store, Grand Theft Auto GTA5 style art"]
[midjourney prompt="an image for a blog post on the topic '%post_title%'" aspect_ratio="1:1"]
These functionalities offer a flexible way to enrich your posts with high-quality, AI-generated images, allowing for a wide range of creative expressions tailored to your content’s specific needs.
There’s probably no need to include examples of images created with Midjourney in this article. Midjourney has become the top-recommended service for generating images for your newly created or modified articles. It’s worth noting that in the latest versions of the CyberSEO Pro and RSS Retriever plugins, within the Media Enrichment settings menu, there’s an option to “replace the first image.” This feature allows the replacement of the first image in an imported article with one created by AI. This functionality is particularly beneficial for those importing articles from external content sources.
After providing a brief overview of this new feature, it seems appropriate to offer a practical guide on obtaining a Discord token for use in the BYOA (Bring-Your-Own-Account) plan settings to access the GoAPI API.
How to get your Discord token
You should understand that by providing your Discord token (as well as tokens for other social networks like Instagram, Facebook, etc.) to third-party services like GoAPI.ai, you are granting them access to your account. In doing so, you assume full responsibility for any consequences. Therefore, it is advisable not to use your primary account for these purposes and instead create a special dedicated account for this. If you do not trust a given third-party service, the best option for you would be to use the Pay-Per-Use (PPU) plan, which does not expose your personal Discord account to any potential risks.
A Discord token serves as a cryptographic identifier for your Discord account, created at the time of account setup. It’s a unique alphanumeric string that functions as an authorization code, facilitating access to Discord’s servers and validating the actions you perform on the platform. This token is vital for various integrations, including with GoAPI.ai, providing a secure method to authenticate and communicate with Discord’s API.
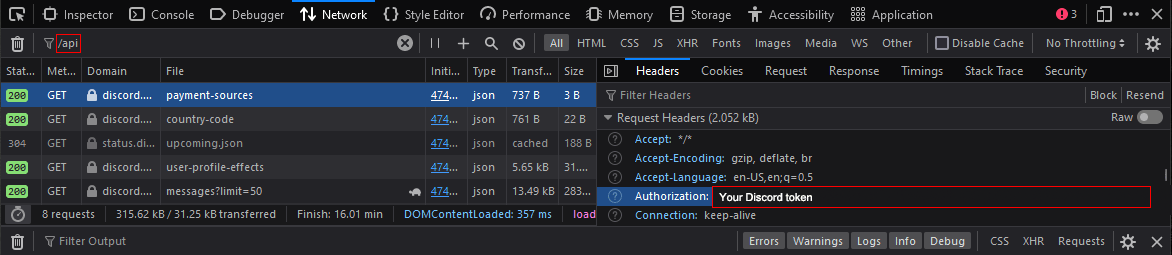
- Navigate to Discord in a web browser. Use the direct link provided to open Discord and select “Open Discord in your browser” to proceed.
- Enter your Discord credentials to log in. Ensure the login process is completed through a web browser.
- Once logged in, activate the Developer Tools by pressing “Ctrl” + “Shift” + “I” on your keyboard. Mac users should use Option+Cmd+I. Refresh the page (F5) after the developer tools appear.
- Within the Developer Tools, find and click on the “Network” tab. Refresh Discord by pressing “F5”.
- In the Network tab’s filter box, type “/api” to filter for Discord APIs. Select “Library” from the filtered results.
- In the header section of the selected “Library“, find the “Authorization” line which contains your Discord token. Copy this token for your use.
Chrome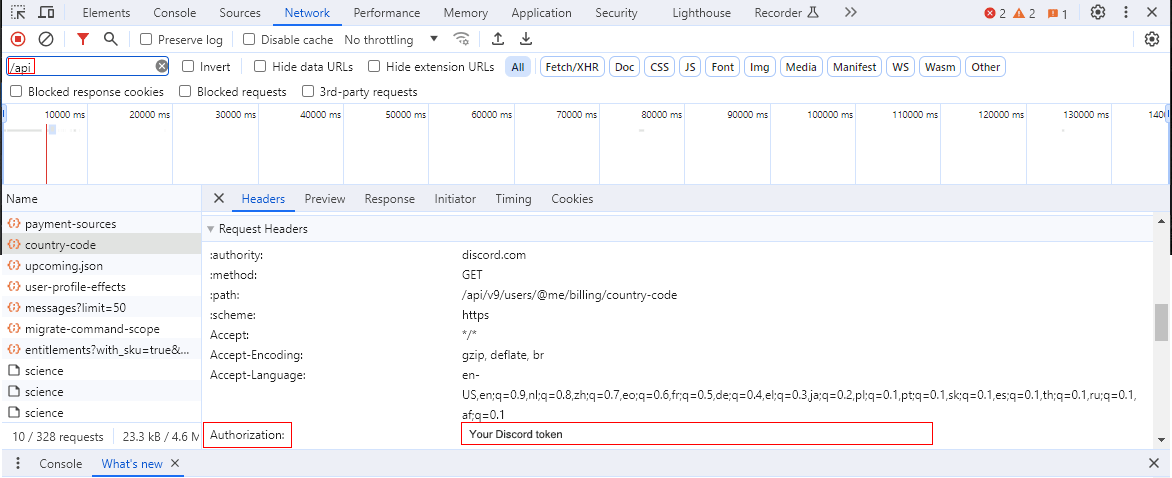
Firefox